
Generate and Use Subkey(s)
A subkey is an extra key attached to your main key (the primary key). Subkeys do the everyday jobs, like encryption, signing, and login. The primary key proves who you are and manages your subkeys, so you can keep it somewhere safe.
Making a subkey takes only a few clicks. This guide shows that first. The reasons and the advanced setups come later. You can skip them until you need them.
Make a Subkey
Section titled “Make a Subkey”You can only add a subkey to one of your own key pairs, and only when its private primary key is in the key database.
-
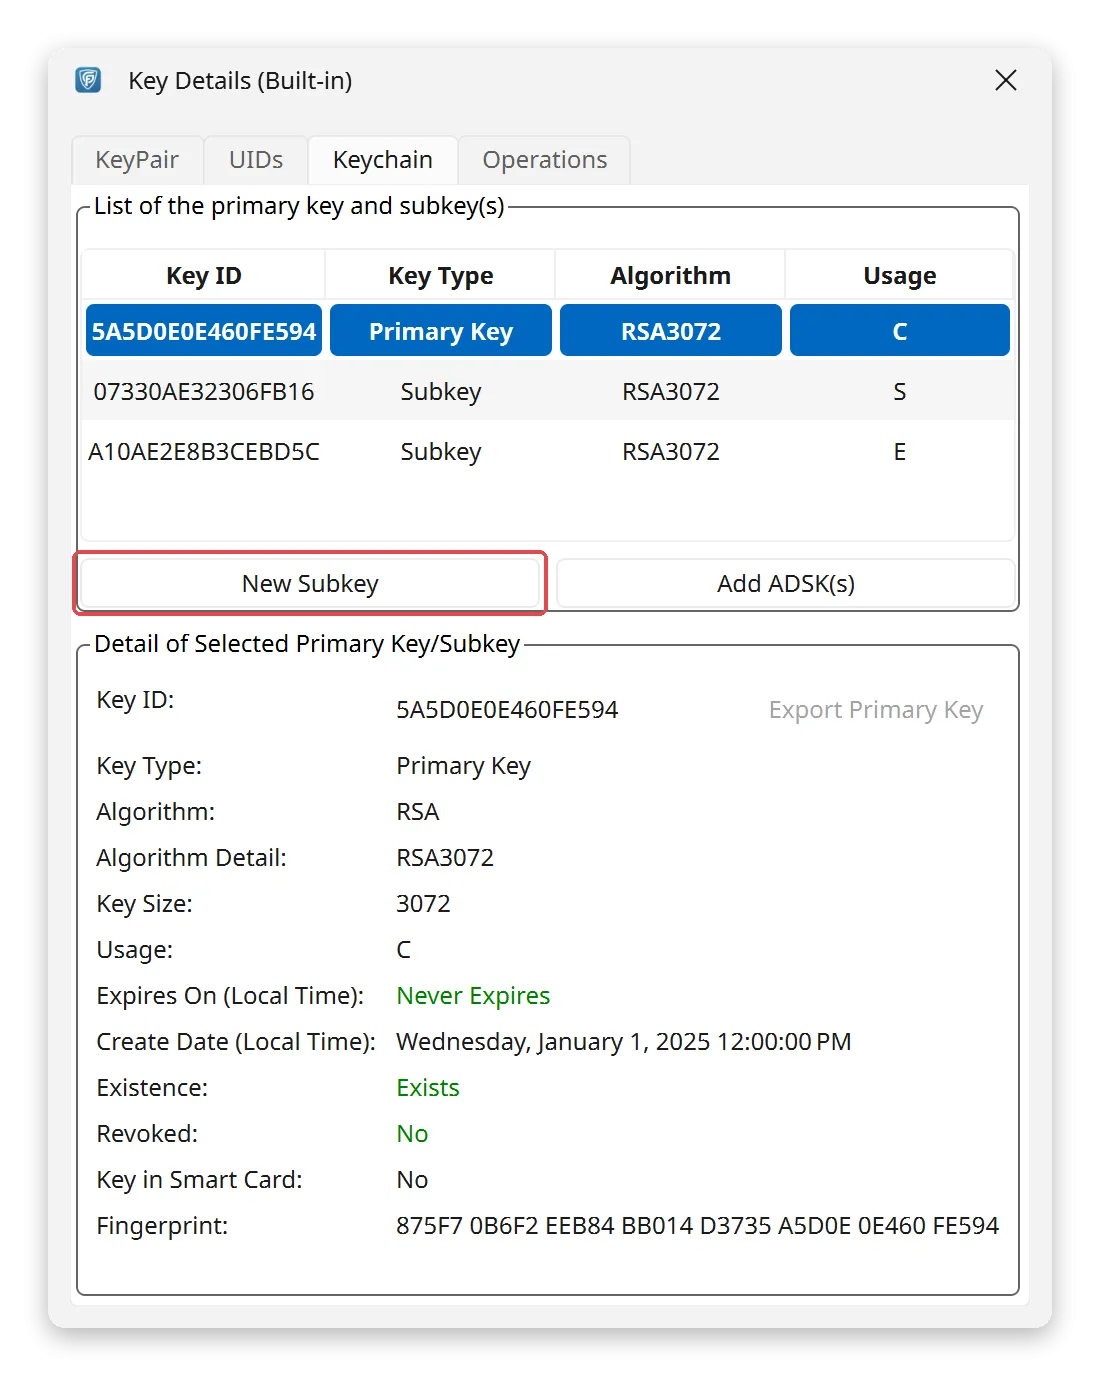
Double-click the key pair in the Key ToolBox list. The Key Details window opens.
-
Open the Keychain tab.
-
Click New Subkey. The Add Subkey window opens.
Step 1: Choose What the Subkey Is For
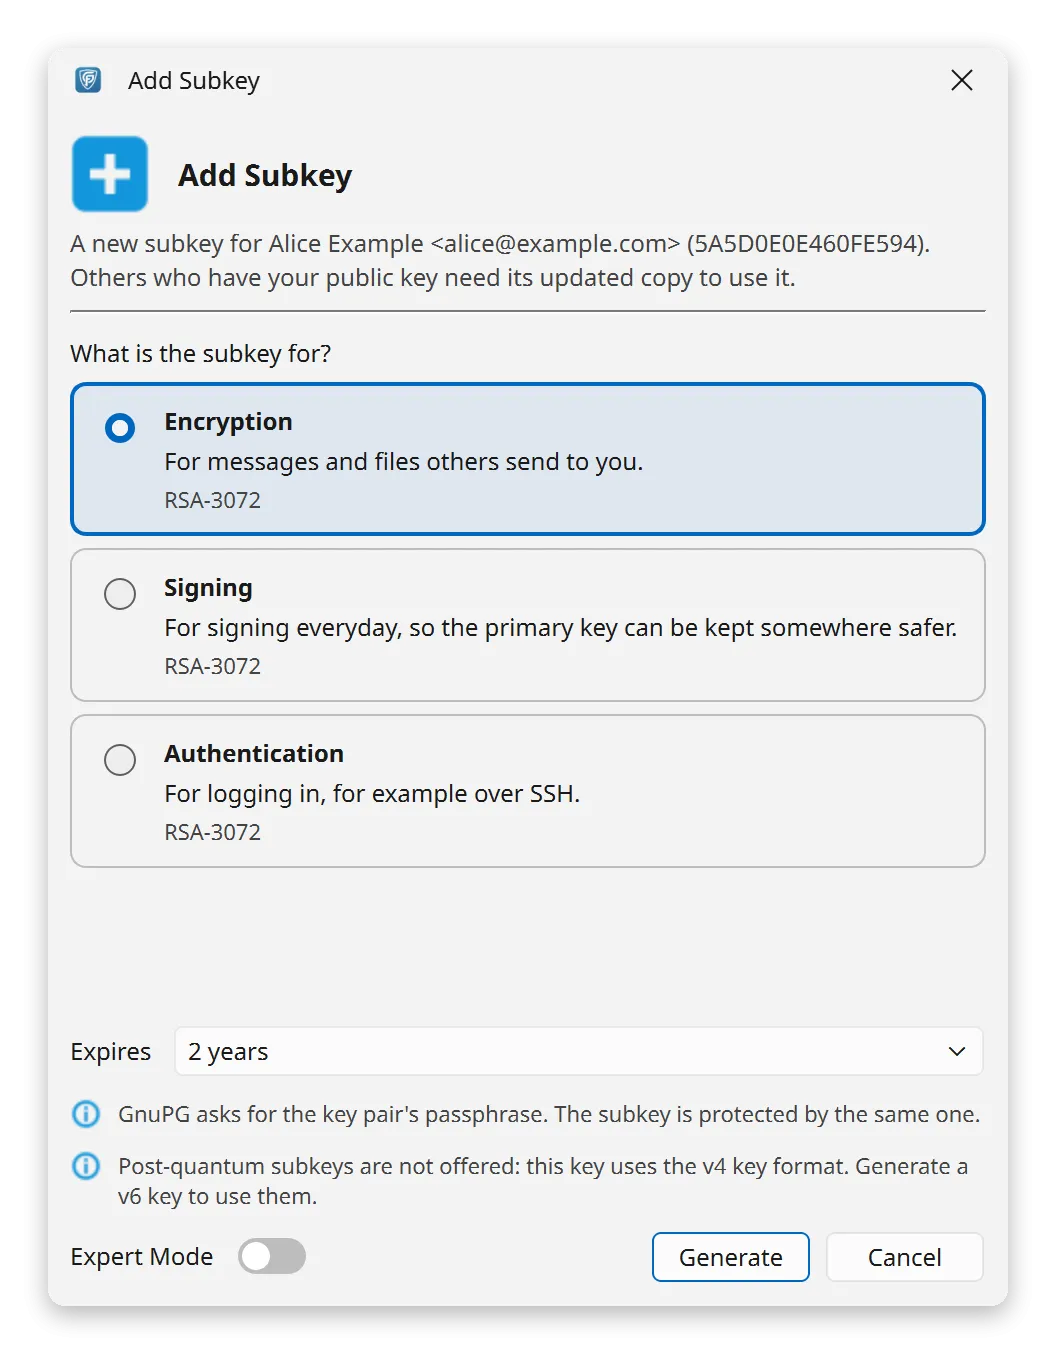
Section titled “Step 1: Choose What the Subkey Is For”Under What is the subkey for?, click one choice:
- Encryption (picked for you): for messages and files others send to you.
- Signing: for everyday signing, so the primary key can be kept somewhere safer.
- Authentication: for logging in, for example over SSH. Skip it unless you need it.
Each choice shows the algorithm it will use. GpgFrontend picks one that matches your primary key. A choice that does not fit your key says Not available for this key.
Then pick when the subkey Expires. The default is 2 years. You can pick another period, Never, or Custom date.
To choose everything yourself, turn on the Expert Mode switch. You then pick the Algorithm, Key length and Usage (Encrypt, Sign, Authenticate). For hybrid algorithms, such as the post-quantum ML-KEM ones, Paired with and Its key length also appear. You can also tick Without a passphrase, if your OpenPGP engine allows it.
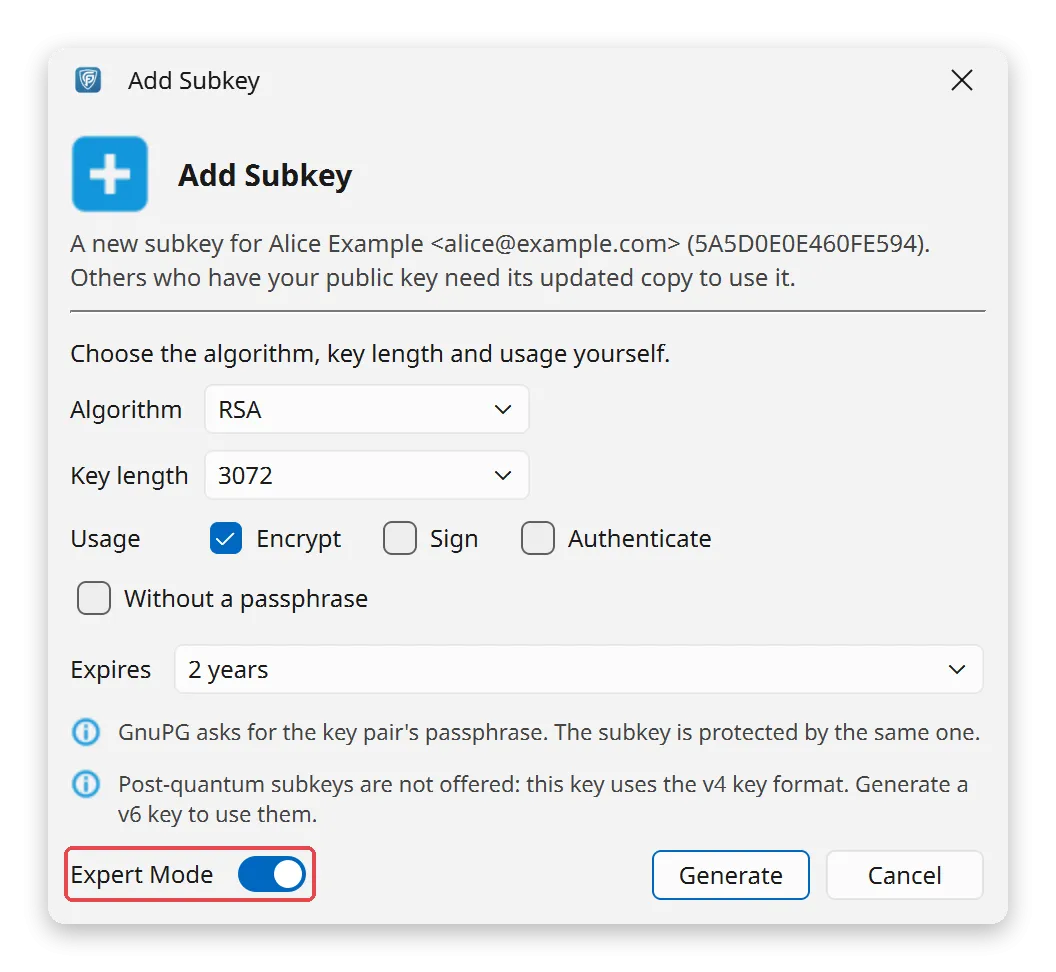
Post-quantum subkeys are only offered for keys in the v6 format. For a key in the older v4 format, a note in the window says so.
Step 2: Generate
Section titled “Step 2: Generate”-
Click Generate.
-
When asked, type your key’s passphrase. With GnuPG, the new subkey is protected by the same passphrase as the key pair.
-
A Subkey Added message appears. The new subkey is now in the list on the Keychain tab.
That’s all you need to add a subkey.
Why Subkeys Help
Section titled “Why Subkeys Help”A key pair is one primary key plus one or more subkeys. Splitting the work between them keeps you safer:
- The primary key is your identity. It certifies (signs) your subkeys and other people’s keys. You rarely need it day to day.
- Subkeys do the daily work. Each one handles a single job, like signing or encryption.
Because the jobs are split, you get:
- Better security: if a subkey is stolen, you revoke (cancel) just that subkey and keep the rest.
- Flexibility: each job has its own subkey. You can renew or revoke each one on its own.
- Easy replacement: you can swap a signing or encryption subkey for a new one. The trust other people put in your primary key stays.
Advanced users go one step further and keep the primary key offline. The rest of this page shows how, and adds some reference notes. You can stop here and come back when you need it.
Keep Your Primary Key Offline (Optional)
Section titled “Keep Your Primary Key Offline (Optional)”Everything below is optional. It covers a more secure setup: you move your subkeys into a separate key database and keep your primary key safe and offline.
Why do this? If your primary key sits on the same computer as your subkeys, a thief who gets the computer gets the primary key too. If the primary key is kept offline (or on a hardware device), a stolen laptop only exposes the subkeys. You can revoke and replace those. But if you lose the primary key, you lose control of your whole identity, so back it up safely first.
The setup has three steps:
- Export a subkey to its own file.
- Import that file into another key database.
- Remove the primary key, and use the subkeys on their own.
Step 1: Export a Subkey
Section titled “Step 1: Export a Subkey”-
Open Key Details: double-click the key in the Key ToolBox. The Key Details window opens.
-
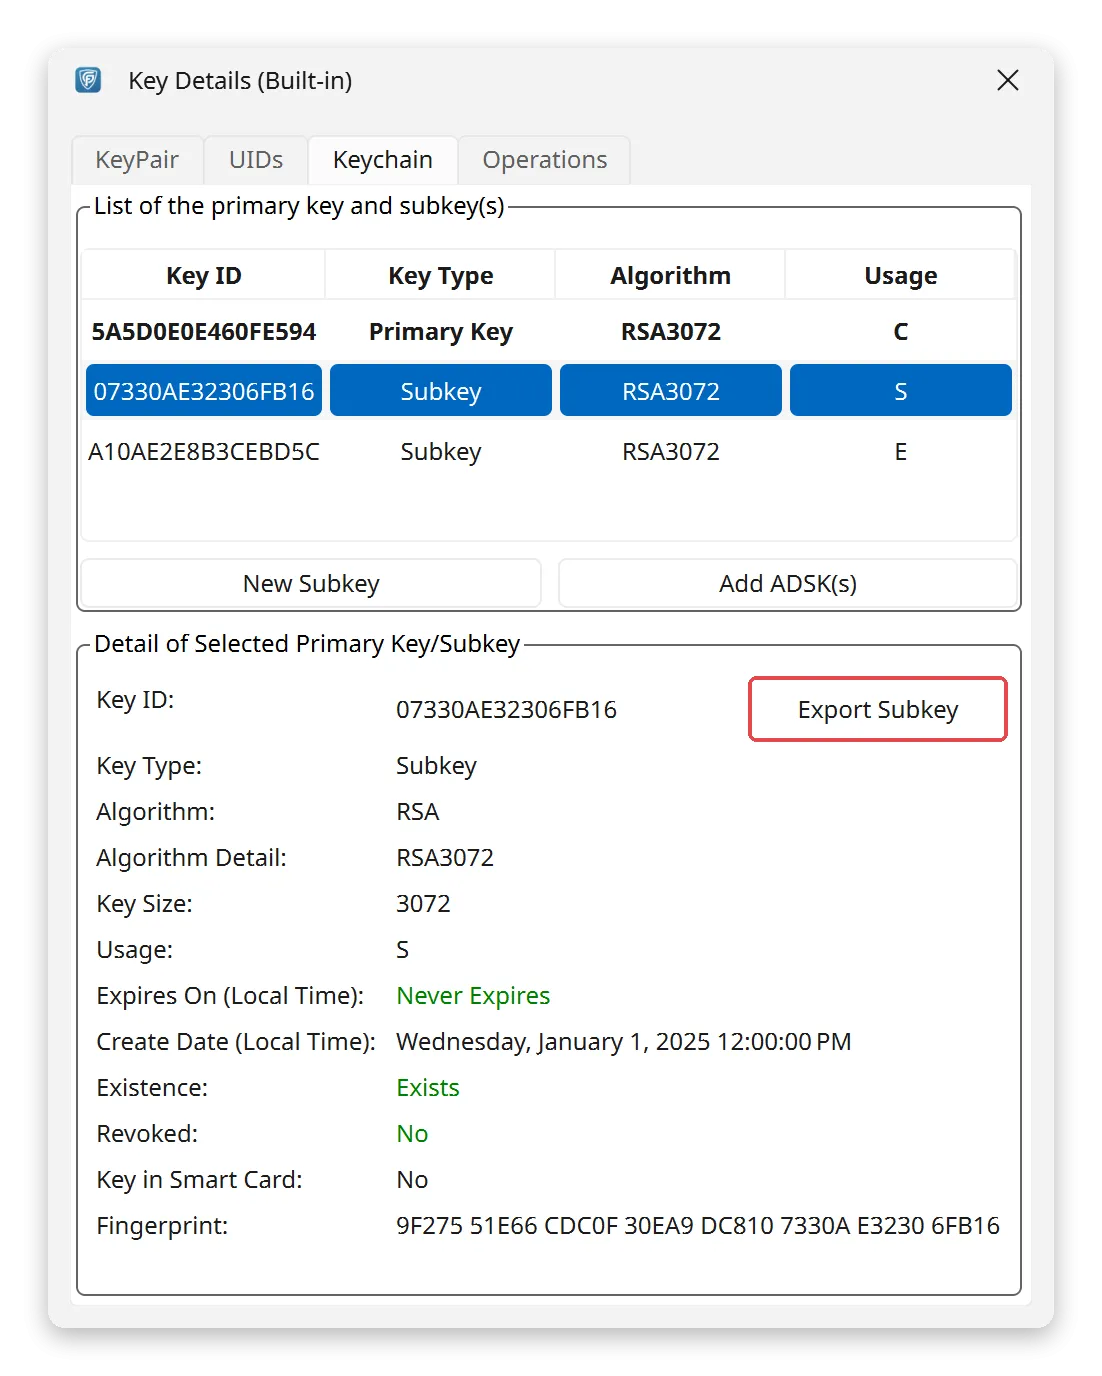
Open the Keychain tab: here you see the primary key (first row) and all its subkeys.
-
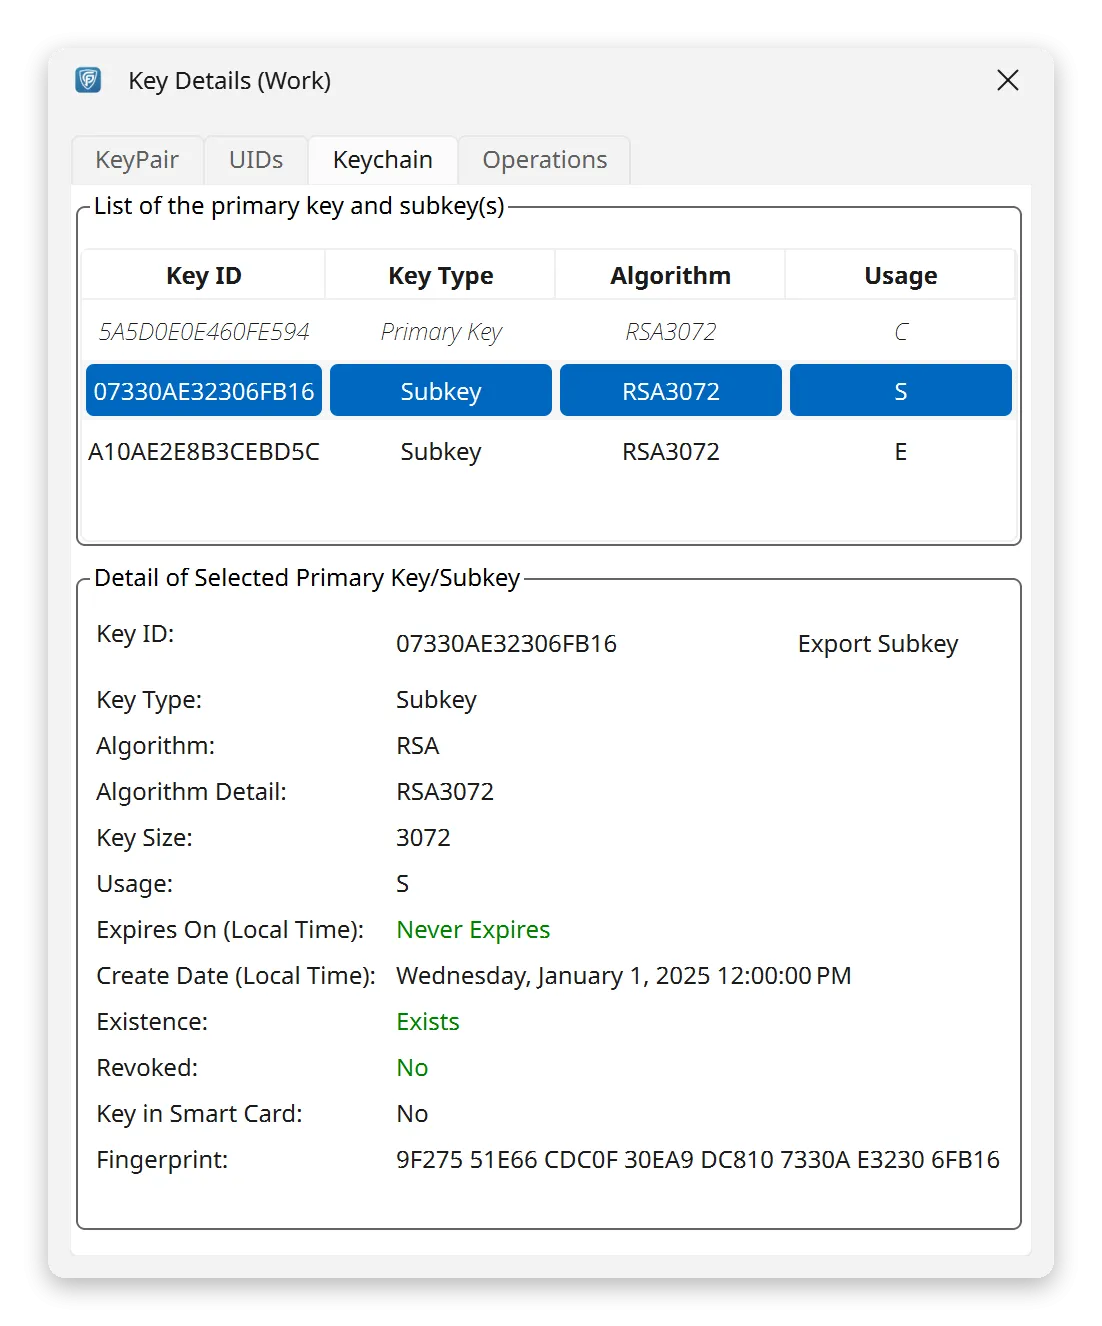
Select a subkey: click the subkey you want. Its details (such as Key ID, Algorithm, Key Size and Usage) appear in the lower half of the window.
-
Export it: click Export Subkey on the right. (If the selected row is the primary key, the button says Export Primary Key and is greyed out.) GpgFrontend asks you to confirm. Click Yes.
-
Save the file: choose a safe folder and save the subkey as its own file.
Step 2: Import the Subkey into Another Database
Section titled “Step 2: Import the Subkey into Another Database”-
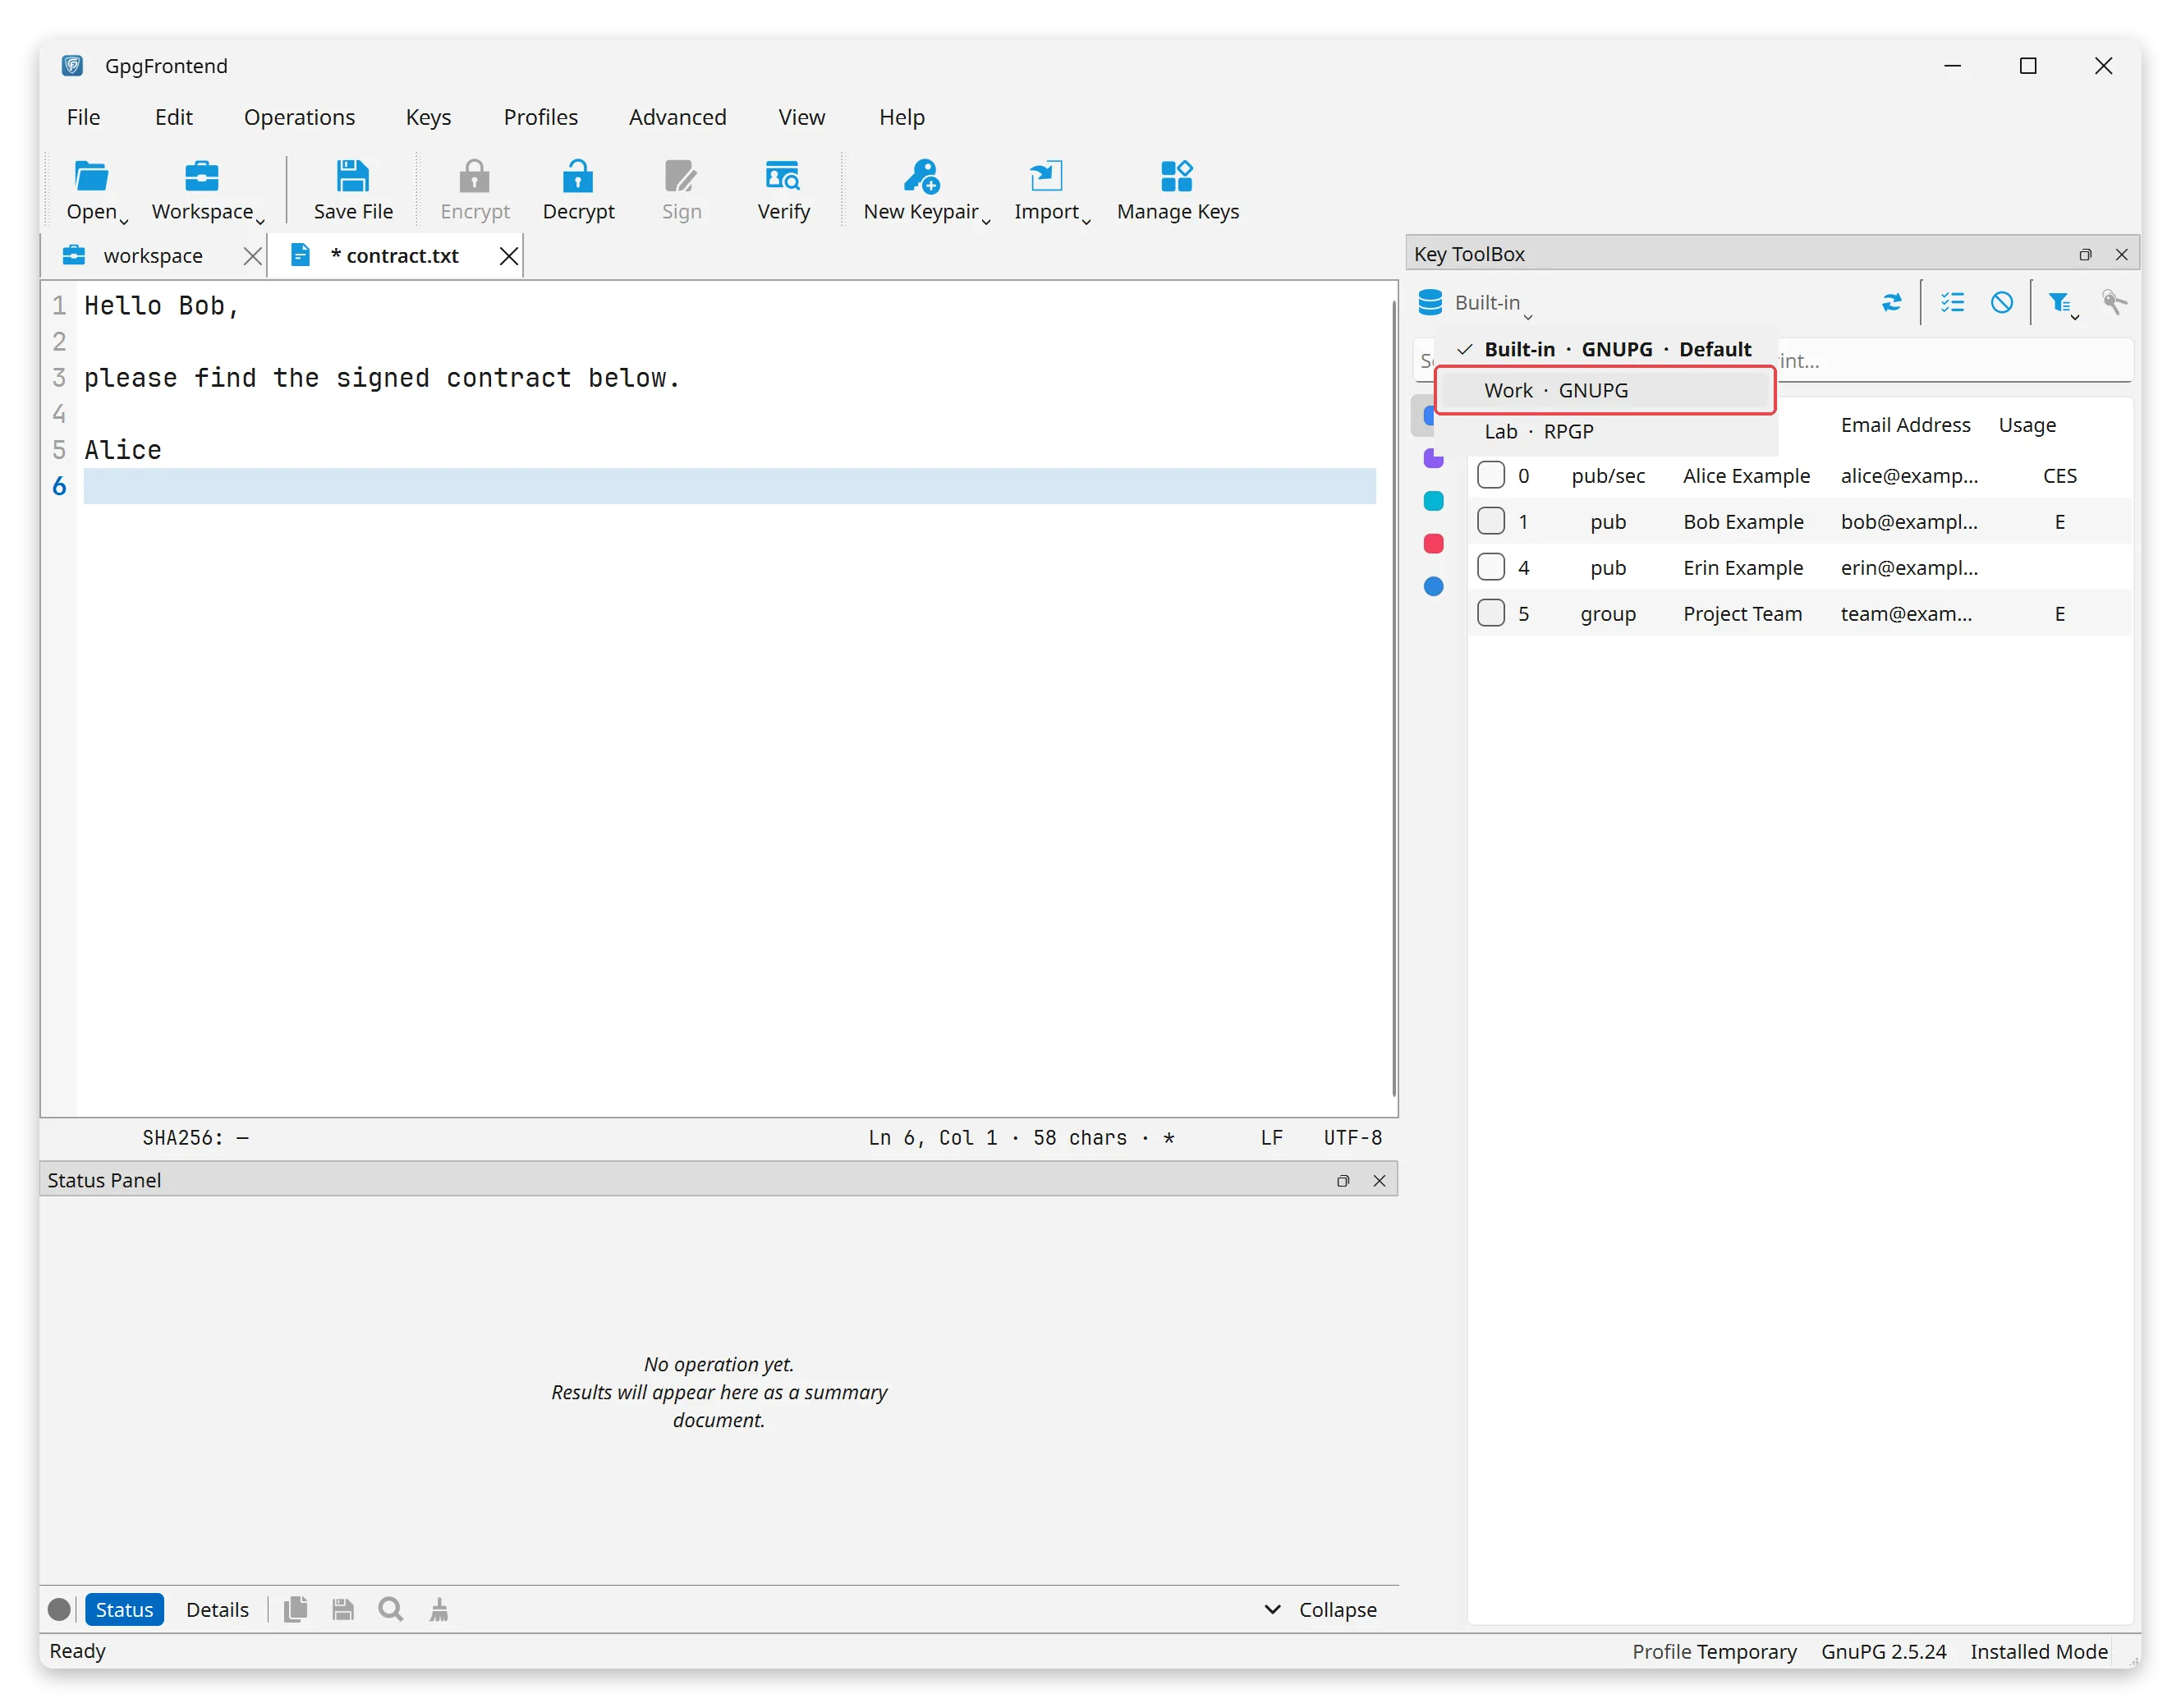
Pick the key database: in the Key ToolBox, switch to the key database that should hold the subkey. See Key Database.
-
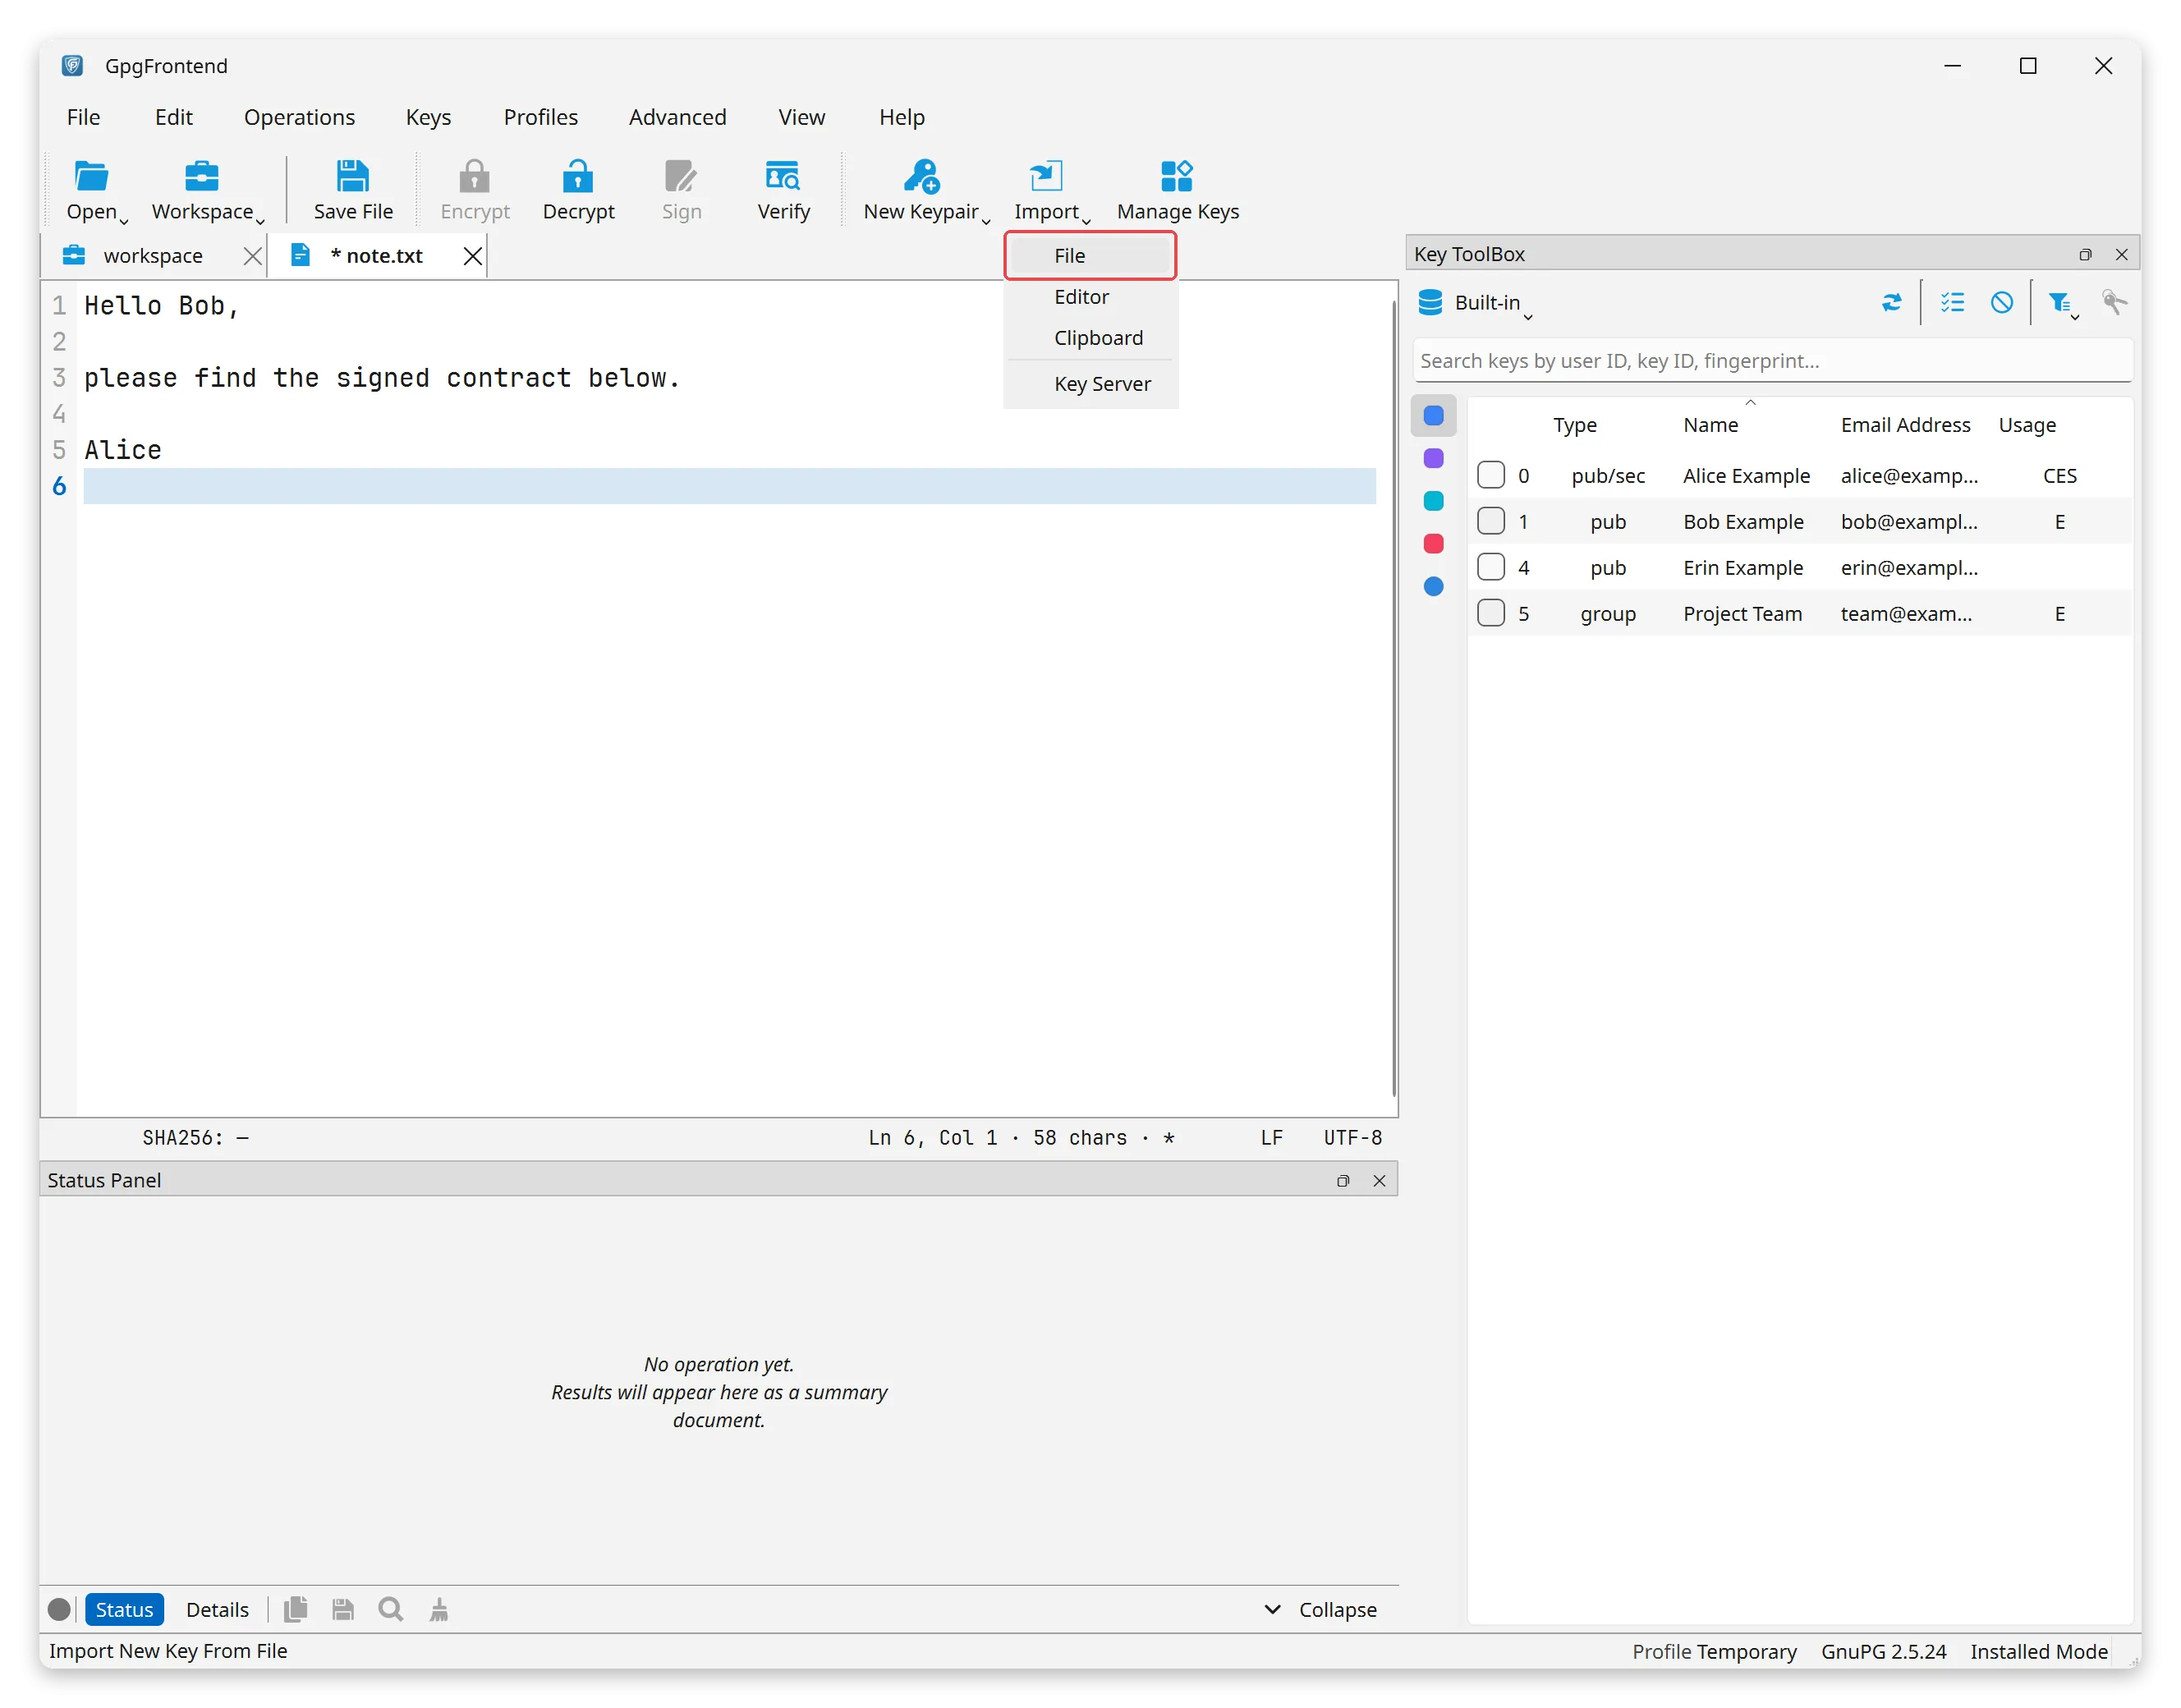
Import the file: click Import in the top toolbar and choose File. Browse to the exported subkey file.
-
Select the file: pick the subkey file and click Open. The subkey is imported into the key database you chose.
-
Check it: find the key in the Key ToolBox, then double-click it to open its Key Details.
Step 3: Use a Key Without Its Primary Key
Section titled “Step 3: Use a Key Without Its Primary Key”Once the subkey is in its own database, you can store your primary key somewhere safe and delete it from GpgFrontend. The key still works for everyday tasks, with a few limits.
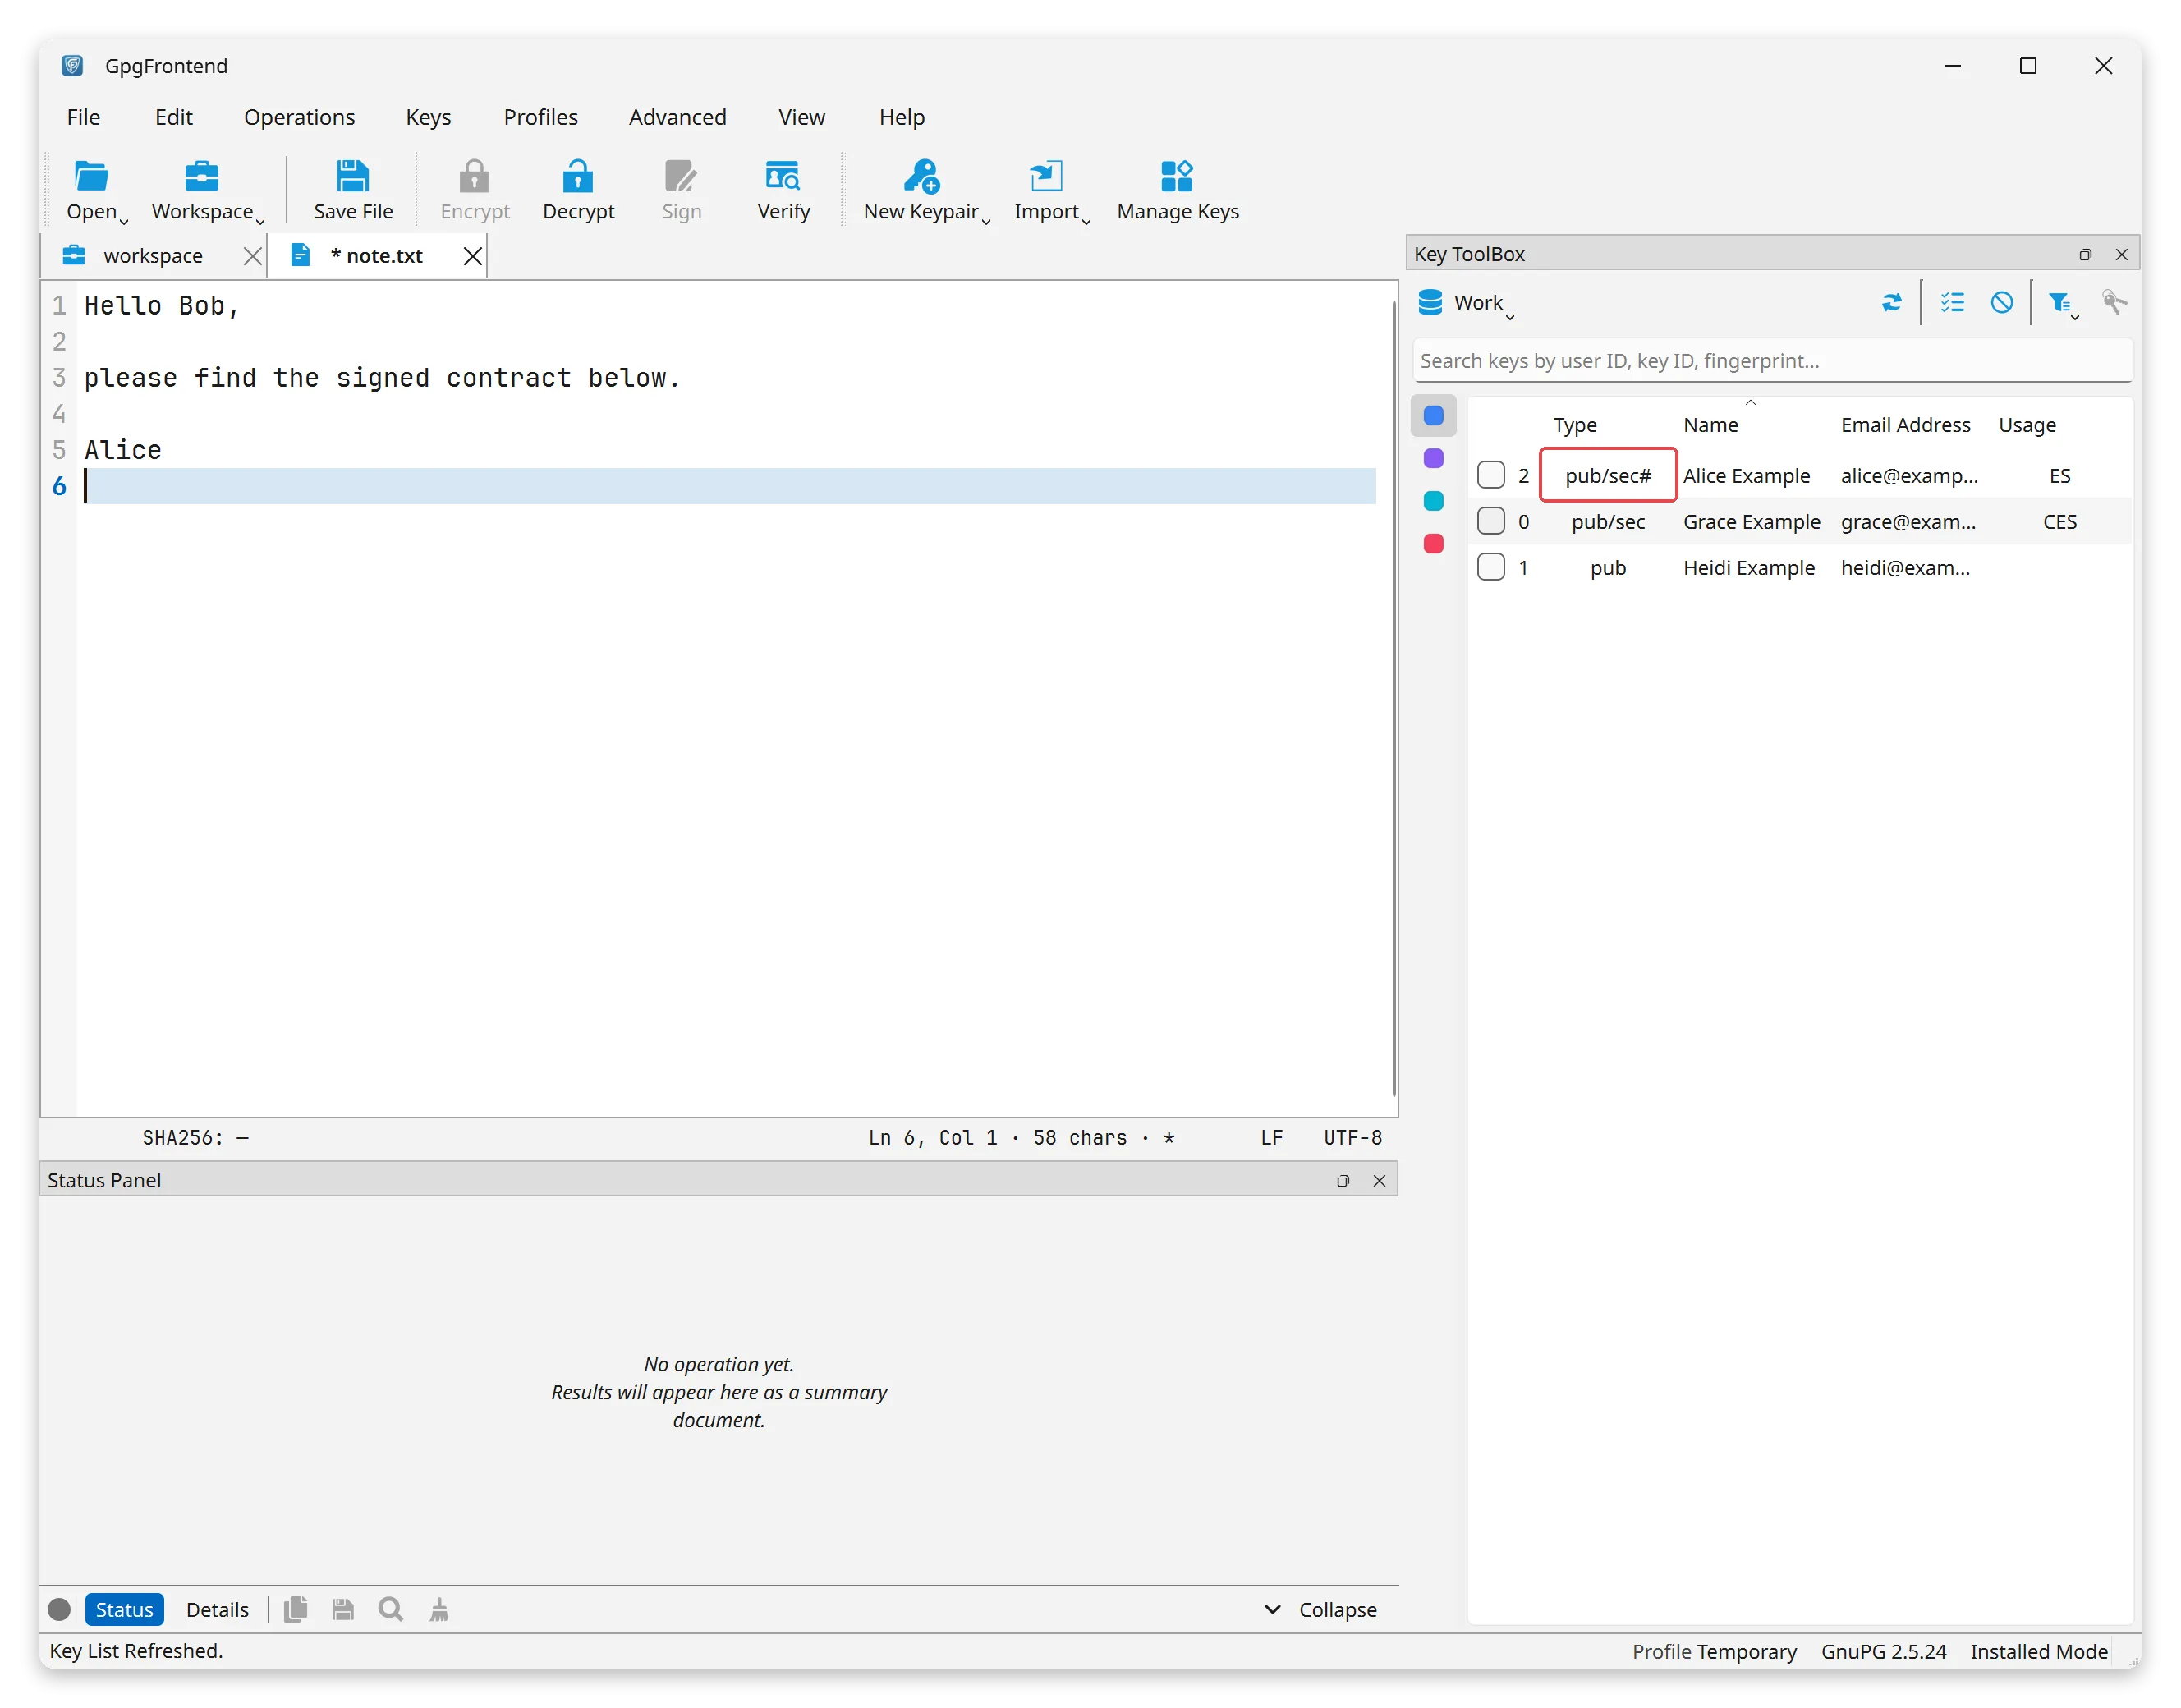
In the Key ToolBox, a # at the end of the Type (for example,
pub/sec#) means the private primary key isn’t in this key database. This is
expected when you have removed the primary key on purpose and kept the subkeys
for daily use.
To confirm, open the key’s Key Details. On the KeyPair tab, the Primary Key Existence field should say Not Exists.
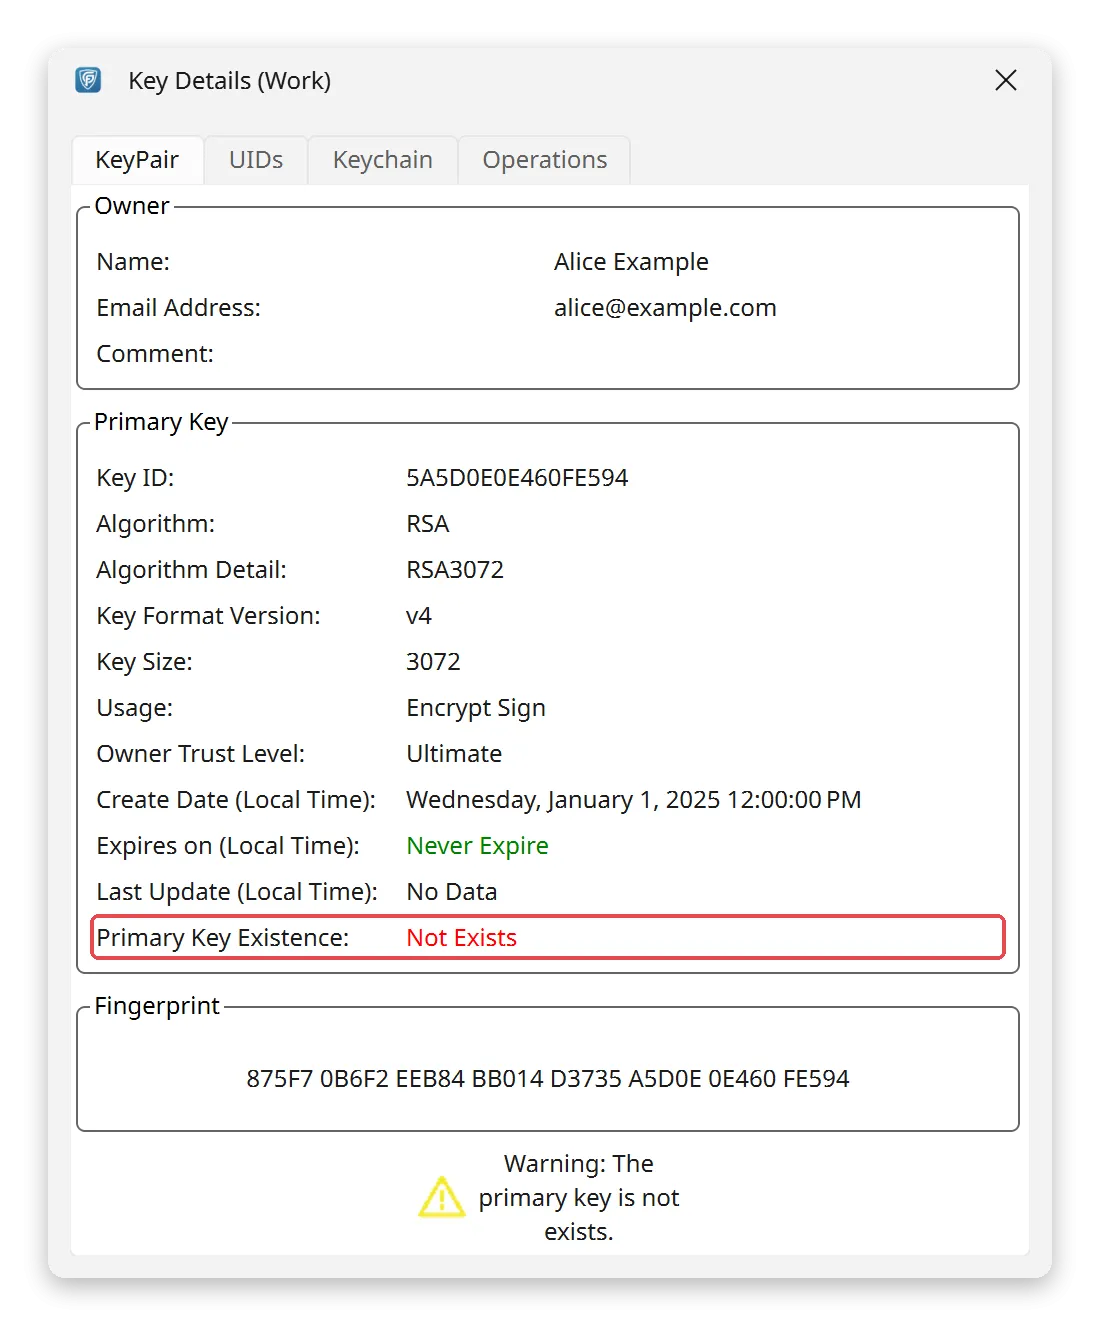
What still works with only subkeys present:
- You can still encrypt and decrypt (for example, emails or files).
- You can sign, but only if you kept a signing subkey. So make a signing subkey before you remove the primary key, if you’ll need one later.
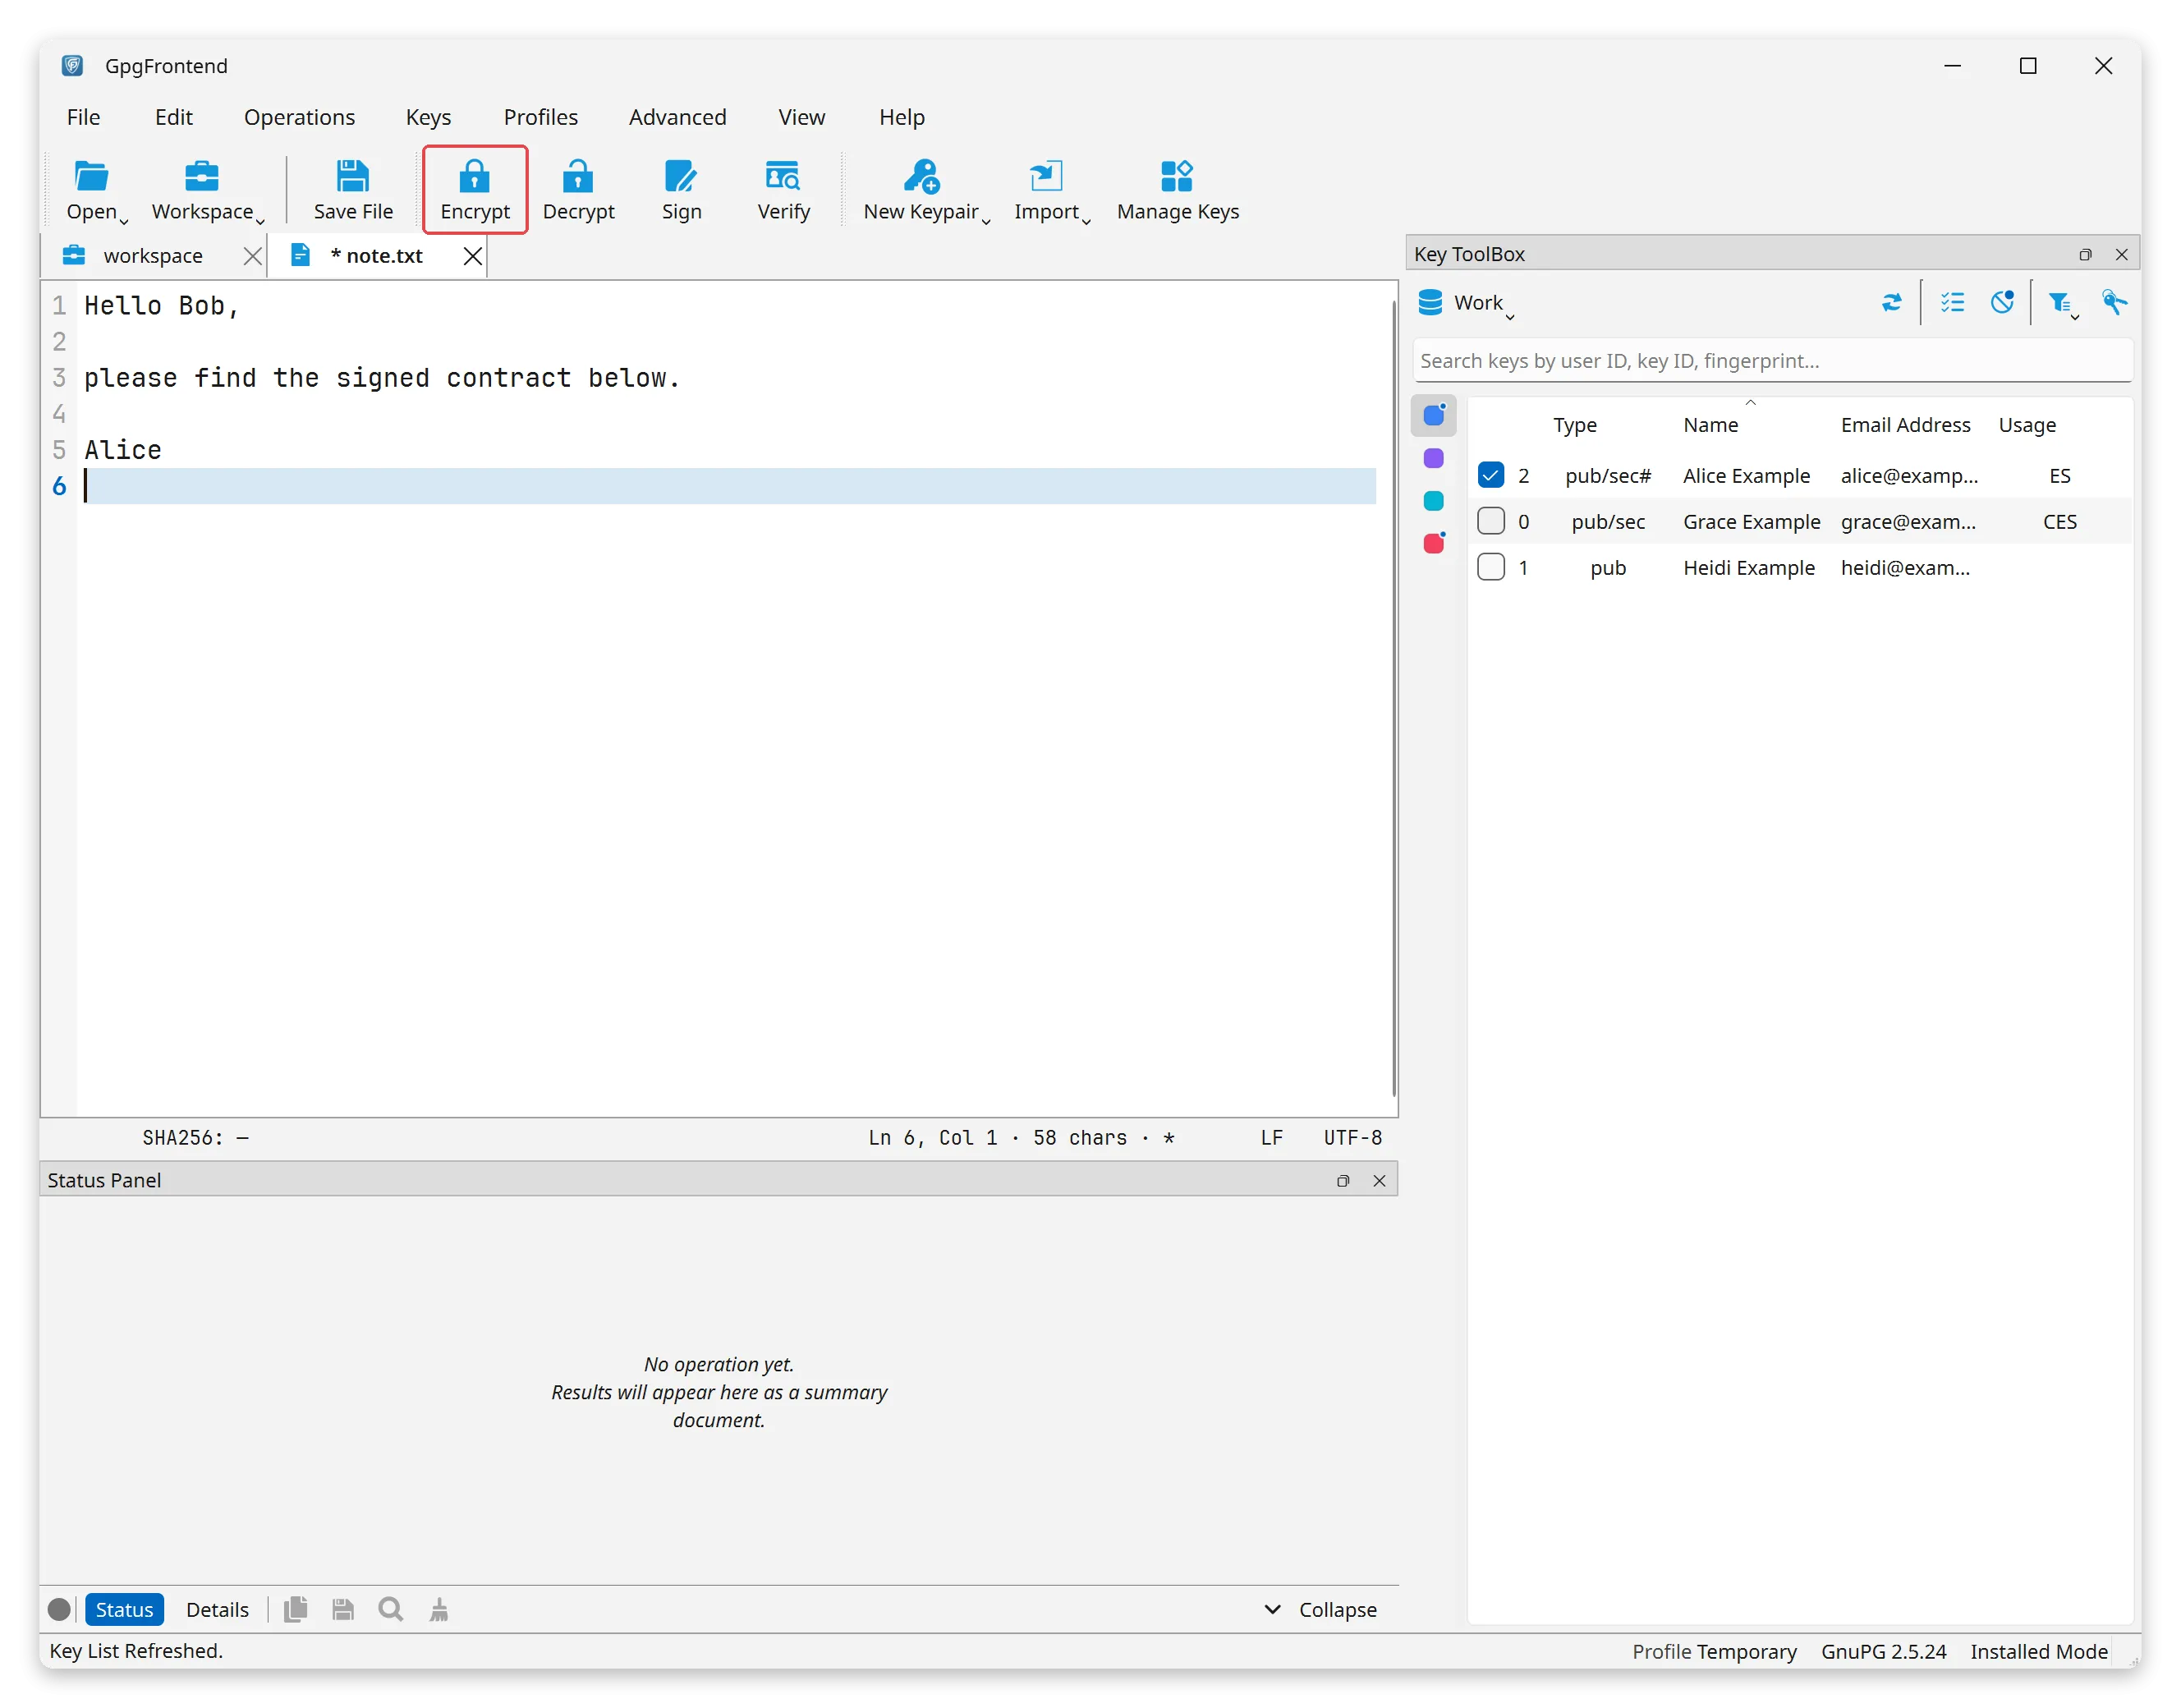
What you can’t do without the primary key:
- Create new subkeys.
- Add a user ID (UID).
- Certify other keys (sign them as trusted).
- Make a revocation certificate for the subkey or primary key.
All of these tasks need the private primary key.
Add a Decryption Subkey (ADSK)
Section titled “Add a Decryption Subkey (ADSK)”The Keychain tab also has an Add ADSK(s) button. ADSK is short for Additional Decryption Subkey. It attaches another key’s encryption subkey to your key. Messages encrypted to you can then also be read by the owner of that other key (for example, your organization’s backup key).
Common Questions About Subkeys
Section titled “Common Questions About Subkeys”When you export only a subkey and import it elsewhere, you may notice that:
- The key list still shows the primary key’s ID for the key.
- The key still shows its full structure (the primary key and any other subkeys), even though only the exported subkey can be used.
- The usage letters (C, E, S, A for Certify, Encrypt, Sign, Authenticate) can differ from the original key.
This is not a bug. It is how OpenPGP and GnuPG describe keys.
Why does the full key structure show up?
Section titled “Why does the full key structure show up?”When you export only one subkey’s private part, the file still holds the full public key (the certificate). Only some private parts are in it:
- The public part still holds the primary key’s details, all user IDs, and all subkeys.
- The primary key’s private part is missing, so you can’t certify, revoke, or make more subkeys.
- The file has to include the primary key’s public part. A subkey is only trusted because the primary key certified it.
Without the primary key’s public part and its signatures, other OpenPGP tools would not trust the subkey.
Why is the Key ID still the primary key’s?
Section titled “Why is the Key ID still the primary key’s?”OpenPGP tools (GpgFrontend, Thunderbird, and others) name the whole key by the primary key’s ID. This keeps things the same across tools. You can’t make a subkey that stands alone with its own identity. A subkey only has value through its link to the primary key.
Can I use only a subkey for everything?
Section titled “Can I use only a subkey for everything?”Yes, as long as you made the subkeys you need for signing, encryption, and login. But some actions, like certifying other keys or adding user IDs, still need the primary key.
Subkey Algorithms
Section titled “Subkey Algorithms”Subkeys offer more algorithms than primary keys. A primary key must use an algorithm that can sign. A subkey can also use an algorithm that can only encrypt (such as Curve25519, X448, or ElGamal). For the primary key list, see Generate Key Pair.
The algorithms you see depend on the engine, its version, and the key format. GnuPG is the recommended engine for the widest compatibility. rPGP adds experimental support for OpenPGP v6 and some post-quantum algorithms. In the table, “Auth” means authenticate (log in) and “PQC” means post-quantum. For more detail, see Comparison of Cryptographic Algorithms.
| Algorithm | Purpose | Engine |
|---|---|---|
| RSA | Encrypt / Sign / Auth | GnuPG rPGP (3072 bits or more) |
| DSA | Sign / Auth | GnuPG only |
ElGamal (ELG-E) |
Encrypt | GnuPG |
| Ed25519 | Sign / Auth | GnuPG rPGP |
| Ed448 | Sign / Auth | rPGP only |
| Curve25519 / CV25519 | Encrypt | GnuPG rPGP |
| X448 | Encrypt | GnuPG 2.3+ rPGP |
| NIST P-256 / P-384 / P-521 | Encrypt / Sign / Auth | GnuPG rPGP |
| Brainpool P-256 / P-384 / P-512 | Encrypt / Sign / Auth | GnuPG 2.3+ |
| secp256k1 | Encrypt | GnuPG 2.3+ |
| Kyber / ML-KEM hybrid variants | Hybrid PQC Encrypt | GnuPG 2.5+ rPGP |
| SLH-DSA-SHAKE variants | PQC Sign / Auth | rPGP only |
| ML-DSA hybrid variants | Hybrid PQC Sign / Auth | rPGP only |
Compatibility Notes
Section titled “Compatibility Notes”Some keys made with the rPGP engine can’t be used with GnuPG. This is true for 25519 keys and for most post-quantum keys. For the full list, see the Compatibility Notes for key pairs.
One point is special to subkeys:
- Kyber / ML-KEM hybrid encryption isn’t rPGP-only. GnuPG 2.5 and later can make these subkeys too. The rPGP engine supports only two pairings: Kyber-768 + Curve25519 and Kyber-1024 + X448. The other pairings need GnuPG 2.5 or later.